MagicCute Software
is committed to providing the most reliable and outstanding Data Backup and Data Recovery solutions for users. MagicCute has its own development team and support team.
Implement of Dual Boot with Windows XP and Windows 7/Vista
Problem:
You have a computer. There is only a pre-installed Windows 7 in it. Now, you would like to append you old XP in this computer to make a dual boot.
Prepare:
If you do not have a partition to store your old XP system in windows 7 computer, you should prepare one before the following steps in Solutions. Windows 7 has a powerful buildin partition manager. You can use it to do what you want. Please refer to http://windows.microsoft.com/en-US/wind … -partition to find out more. Note: You should create a primary partition. It should have enough space to store all the data in your original XP partition. If you do not have free space in you new laptop to create a new primary partition, you can try to shrink the existing partition(http://windows.microsoft.com/en-US/wind … -hard-disk).
Solution:
The following steps assume your win7/Vista partition is C:. Please change it if your win7/Vista partition is different.
If your XP is in another computer, please make an image of it first. If your XP is already in your win7 computer, please bypass step 1-8.
- Run MagicCute Data Backup in you old drive and select the partition to clone, click “Backup to Image file”.
- Follow the tips and make an image of your source parition. please store the image file in your external HD.
- Disconnect the external HD from your old laptop.
- Connect the external HD to your new laptop.
- Run MagicCute Data Backup in your new laptop(in windows 7).
- Select the “Restore From Images” tab.
- Click “Open” and select the image file in your external HD.
- Restore the image file to your newly created partition.
The following steps will append a Windows XP boot option in your windows 7 boot menu.
After the restore, we must disable the UAC first.
- Please refer to http://www.howtogeek.com/howto/windows- … ows-vista/
Please reboot you system after changing the state. - open your windows explorer. Click “Organize” -> “Folder and search option” -> “View”
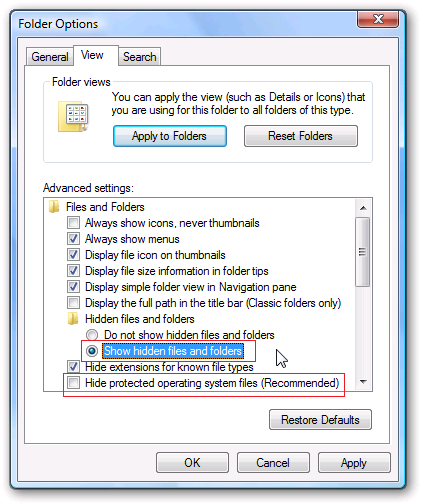
(1) select “Show hidden files, folders, and drives”
(2) unselect the options “Hide protected operating system files” click “OK”. - open D: drive and copy boot.ini, ntdectect.com, ntldr to your C: drive root folder.
- open “boot.ini” in your C: root folder.
chage all
“multi(0)disk(0)rdisk(0)partition(1)”
to
“multi(0)disk(0)rdisk(0)partition(2)”
(2 is the the parition order of your windows xp partition)
If you do no know the partition order of your windows XP partition, please open windows partition manager.
Open Computer Management by clicking the Start button , clicking Control Panel, clicking System and Security, clicking Administrative Tools, and then double-clicking Computer Management. If you’re prompted for an administrator password or confirmation, type the password or provide confirmation. In the left pane, under Storage, click Disk Management.
Find out your windows XP partition order in this dialog. For example,
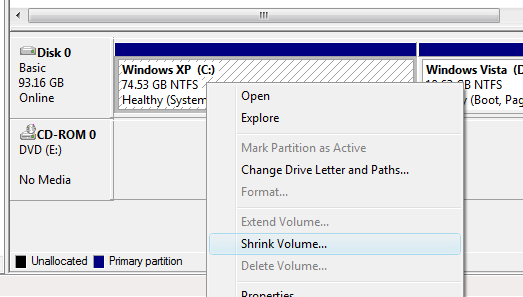
If this case, XP partition is 1. If your XP is in the next one, the order will be 2. - click the win7 start menu button. Input “cmd” in the search bar and press enter.
run the command below step by step:
(1) Bcdedit /create {ntldr} /d “Windows XP”
(2) Bcdedit /set {ntldr} device partition=C:
(3) Bcdedit /set {ntldr} path \ntldr
(4) Bcdedit /displayorder {ntldr} /addlast
The commmand is very important, please do copy them instead of typing the character one by one. - open your windows explorer. Click “Organize” -> “Folder and search option” -> “View”
(1) select “Don’t show hidden files, folders, and dives”
(2) select the options “Hide protected operating system files” click “OK”. - click the win7 start menu button. Input “uac” in the search bar and press enter.
change the notify state to “Default” . Click yes to confirm. click “OK” - Reboot your system, then you will see the boot menu. Select the one you want.
If boot to xp failed, you may chage 2 to 3 or other in boot.ini to try again. Please refer to step 10 to show the boot.ini file.
Very Easy to Use

Ready to have a try or Purchase?
 Purchase MagicCute Data Backup Purchase MagicCute Data Backup |
 Download MagicCute Data Backup Download MagicCute Data Backup |

System Requirements:
Windows 2003/XP/Vista/7 DirectX 9
Purchase

Testimonials
| "It is one of the most efficient hard drive upgrade/backup solutions. It is easy but not simple. " "It is an excellent data backup software product. " |
" I just bought this software to carry out an emergency disk clone on my rapidly failing hard drive and it worked perfectly and so very quickly compared with others I've tried. "
--- Paul, from GB
Awards